Thursday, September 20, 2012

Java Control Panel is missing Update options

Remember when you wanted your computer to boot up fast so that you could print out your résumé because your interview starts in an hour.  Your closing pop-ups left and right to try and get the computer to boot faster, and the dreaded Java Update pop-up comes into the foreground.  You tell yourself, "I gotta remember to update Java, or disable the update."  You check the Java control panel, and there is no place to disable the automatic update.
Yes, I know that is from a Windows 7 computer,
but the solution is applicable to both OSes.
There is a DWORD key that needs to be added to your registry.
  1. Open a command prompt if you are logged into an admin account.
  2. Enter the following in the command prompt:
    • reg add "HKEY_LOCAL_MACHINE\SOFTWARE\JavaSoft\Java Update\Policy" /v "EnableJavaUpdate" /t REG_DWORD /d "00000001" /f
  3. Check the Java Control Panel.  It should look like the picture below.
If for some reason, you desire to disable the "update" tab, just do the same thing as above, change the DWORD value to "00000000" instead.

Enjoy managing your Java updates!


Tuesday, August 21, 2012

Microsoft® Windows® XP - Disable Autorun

Do you ever treat your computer's USB port as a door knob?  (Every flash drive gets a turn...*insert the sound of crickets*...it sounded funnier in my head.)  Have you ever had a computer after connecting a flash drive, or inserting a CD in your CD drive?  Microsoft® Windows® XP has a feature called autorun, and this feature causes a flash drive/CD to automatically start a program.  Personally, I think that the autorun feature is a big security hole when it comes to preventing a virus from installing itself.  I know of a library that would allow patrons to connect a flash drive to the computers, thus the computers would become infected with a virus.  Much like Typhoid Mary, the computer would infect any flash drive and external drive that it will come into contact with.  The virus would also infect any network shares which were mapped on the computer.  Enough explanation, on with the show.

There are two ways to disable the autorun feature of Microsoft® Windows® XP.  The easy way is by using the Microsoft® Fix it utilities.
Done and done!

Oh, for whatever reason you want to disable the autorun using manual settings?  Really? Seriously?!  Who am I to prevent you from wasting you time doing manual IT labor?  In a nutshell, execute the following instructions:
  • Launch Group Policy Editor by running Gpedit.msc
  1. Click Start, click on Run, type Gpedit.msc in the "Run" dialog box, and press Enter.
  2. Expand Computer Configuration, expand Administrative Templates, then select System.
  3. Focus your view in the right-hand side of the window, look for Turn off Autoplay which you will double-click.
  4. Once you see the settings of Autoplay, click on Enable to turn off Autoplay, or select Disable to enable Autoplay.
  5. With Autoplay disabled, select All drives under the "Turn off Autoplay for:" dropdown menu.
  6. Enjoy your computer Autoplay free!
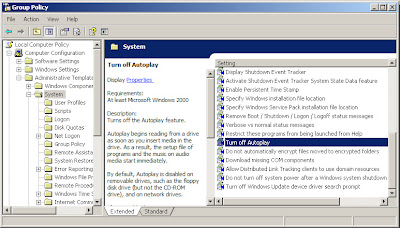
Microsoft® Windows® Group Policy Editor

What?  You want to see yet another complicated way to disable/enable Autoplay?  Follow the link: http://support.microsoft.com/kb/967715 which will lead you to the same page where I got the information for this posting.  If you scroll all the way to the bottom, you will see a set of instructions on how to do this through the registry.

Good luck with modifying your registry...

Sunday, August 19, 2012

Google Search Tips

Have you ever had a hard time finding what your looking for on the internet?  Below you will find different tips on how to use Google.

To get the most out of most Google features, I would recommend installing Google Chrome™ browser.

Google search services each have what are known as "search operators".  These operators help you find exactly what you are looking for.

Google Web Search™ has 16 search operators.  I am just going to cover a few of them, and then provide you a link for information on the rest, unless there are request to elaborate on the rest of them.
I like to use "site:" to perform a search on a specific website and/or domain.  For example, let's say that I want to find a Western Digital NAS (Network-Attached Storage) information, but I only want results from the Western Digital website.  I would search for "NAS site:wd.com" and I get 2,300 results as opposed to 1.17 billion results had I just searched for "NAS".  What's that?  You say 2,300 results is still too many.  I personally own a MyBook Live NAS.  If I search for "MyBook Live NAS site:wd.com", I get 613 results, versus 2.18 million results without the operator.

The "site:" search operator is also capable of eliminating results when used with the minus sign, such as "-site:".  If I wanted search results to omit Amazon.com from the search results, I would type, "MyBook Live NAS -site:amazon.com".

By the way, you can also search by domain extension such as ".com, .net, .org, etc..." or omit ".com, .net, .org, etc..." results from your search results.  For example, "MyBook Live NAS -site:.com", would omit results from any website domain ending in ".com".  Oh, before I forget, you don't have to type the "." before the domain extenstion.  "MyBook Live NAS -site:com" would still give you the same results.

In any case, just remember there is no space between the search operator and the domain name/domain extenstion, and you can put more than one search operators per search.  One example would be, "MyBook Live NAS -site:cnet.com -site:amazon.com", which would omit cnet.com and amazon.com from the results.  In case you haven't noticed, also omit the "www" from your search operators, and you can also use quote marks around your search terms to find exact phrases.
Back to the list

"define:" is a search operator that provides the definition of the word entered after the operator.  For example, "define:blog" will provide some definitions for the word "blog"
Back to the list

Have you ever wanted to find an online document or file based on file type?  We'll now you can by using the "filetype:" search operator.  For instance, "california map filetype:pdf" will return links to PDF files.  You can search for any file type.
Back to the list

There are lots of website that provide similar information even if the websites are not directly related to each other.  Let's pretend that I am shopping for a new car and I want to get different websites for car reviews.  I know of a website already because I used this website to help me find the car that I own right now.  The website is Edmunds.com which provides information on new and used cars, as well as car reviews.  I also want to find similar websites of that type.  The "related:" search operator comes to the rescue.

When I perform the following search, "related:edmunds.com", I get results like, kbb.com (Kelley Blue Book), cars.com (car finder website), autotrader.com (car finder and for sale by owner info.), etc...  These website provide similar information, thus the websites are,(dare I say) related.
Back to the list

If you are still awake, I applaud your efforts for staying awake.  If you are waking up on this sentence, I will provide a link to the wireless keyboard and mouse combo that I am using in case your drool ruined the keyboard.  I am also using "eneloop" batteries which last a long time, and are rechargeable.  I have been using them for a year, and I have not replaced the batteries yet.

Microsoft® Outlook 2003 - Recover Deleted Items

Applies to: Microsoft® Outlook 2003

Let's pretend that you have an e-mail account on an Microsoft® Exchange, and also pretend that you access your e-mail using Microsoft® Outlook 2003.  Imagine that you have deleted some e-mail and you no longer see it within Outlook.  There is a way to recover your deleted e-mails from any folder within your exchange account.  Keep in mind this only works if you are using Outlook 2003, and you have an exchange account.  This will involve modifying the Windows registry.

Follow these simple instructions:

  1. Make sure that Outlook is closed.
  2. Open Windows® registry editor
  3. Navigate to:
  4. \HKEY_LOCAL_MACHINE\Software\Microsoft\Exchange\Client\Options
  5. Right-click in the right pane, and select New, then DWORD Value.
  6. The name for the new DWORD Value is DumpsterAlwaysOn.  (There are no spaces)
  7. Double-click on DumpsterAlwaysOn and change the value to 1.
  8. Close the registry editor.  Open Outlook.
To recover an e-mail, select the folder where the e-mail was located, then go to the Tools menu, and then select Recover Deleted Items.  The resulting window will show you a list of e-mails which were deleted from the currently selected folder.

Saturday, August 11, 2012

Optimize Microsoft® Windows® XP Series: Trimming your system bloat - Part 1

Optimizing Microsoft® Windows® XP Series: Post 2 - Part 1

Think about the feeling you get after a huge Thanksgiving feast over at aunt Ida's house.  Do you feel that tryptophan coursing through your veins?  Do you like feeling bloated?  Then why would your computer like that feeling?  If your computer is in need of some spring cleaning, then read on...

Tip #1
I am going to recommend a few thinks that can assist you with controlling bloatware on your computer.  I would highly recommend a good spyware/malware removal tool.  Personally, I would only recommend Piriform® CCleaner and Malwarebytes.  CCleaner cleans up browser history, temporary files that build up, log files, etc.  Malwarebytes cleans up malware (malicious software) such as fake anti-virus programs, pop-up generators, etc.  Both of these are free however, there is a "pro" version of Malwarebytes which also provides real-time protection.  The free version of Malwarebytes does give you a 14-day trial of the "pro" version.  Use them in the following order:

  1. Download Piriform® CCleaner, install it, run it
    • Run this one to remove temporary files, which will reduce the amount of time spent scanning with Malwarebytes
    • CCleaner will clean up the currently logged in profile only.  Run in each user account if you can.  If you can't log in as other accounts, then just expect a longer scan.
  2. Download Malwarebytes, install it, run it.
  3. Enjoy a malware free computer.


Tip #2
The most common useless software installations are web browser toolbars.  I often remove web search toolbars.  The first think that the computer user says is, "But how will I search the internet?" :-|

Every popular web browser let's you search via the address bar, or built-in search bar.  Here is a list:
Alternatively try using the following search engines:  GoogleBing, or Yahoo!

Tip #3 (click on links at your own risk)
There are some computer users that like all of the neat interactive desktop enhancements that can be donwloaded such as, WeatherBug, Desktop Wallpaper w/calendar program, Google Desktop, Windows  Desktop Search, etc... Do not install any of these programs as all they do is use up your limited computer resources.  You want the weather, go to weather.com.  You want desktop backgrounds, Microsoft® has desktop backgrounds.  Oh, you want a celebrity background, go to Google Images.

Part 2 coming soon...

Saturday, August 4, 2012

Optimize Microsoft® Windows® XP Series: Performance Settings

Optimizing Microsoft® Windows® XP Series: Post 1

Ever wonder why your Microsoft® Windows ® XP computer is starting to run slow, and takes forever to finish booting before you can use it?  Did the hamster fall off the wheel?  This post is part of a series of posts geared toward helping you get the most out of the your computer.  Microsoft® Windows® XP has some nice effects that you see when you open programs, click on menus, maximize and minimize windows, customization options that appear very appealing.  However, if you your frustrated with the slow performance of your computer, you will be "a-peeling" your skin off hoping that the computer finishes booting in your lifetime.

One immediate improvement would be to turn off the neat interface extras such as the visual effects.  To do so, follow the steps below:


  1. Right-click on the My Computer icon on the desktop, then click on Properties on the resulting context menu.
    • Alternatively, Click on the start button, go to Settings, and click on Control Panel.
    • If the Control Panel opens in category view, select Performance and Maintenance, then select System.
    • If the Control Panel opens in classic view, double-click on the System icon.
  2. You will see a series of tabs, select the Advanced tab.
    • FYI: If you see 5 tabs, then you are logged with a regular user account.  If you see 7 tabs, then you are logged in with an admin account.
  3. The Advanced tab will show you three sections, right now you need to click on the Settings button within the Performance section.
    • Depending on your service pack level, you might see two or three tabs.
  4. On the Visual Effects tab, select Adjust for best performance.  You will immediately notice that the interface enhancements are deselected.
  5. Click on the Apply button.  You will see a message asking you to Please wait, the view will turn gray, and once finished, the enhancements are turned off.
    • You might say, "but I liked the pretty colors".  Which do you want more, a colorful desktop interface, or gray hair because of the time that has passed you  by while you wait to open Solitaire.
  6. You also have the ability to turn on visual effects that you really want by selecting them on the list below.  This will create a custom selection of interface enhancements that are turned on.
  7. Click on the Advanced tab, select Programs under the two top sections; "Processor scheduling" and "Memory usage".  We will take a look at the Virtual memory on another posting.  Click OK.  Click OK on the System Properties control panel.
  8. Enjoy the slightly improved performance.  I didn't say that this would solve all the performance issues, but it is a step in the right direction.

Next in the series...Trimming your system bloat

Monday, July 23, 2012

Cmd-line (insert Beatles song title), you know the one

When thinking of a title for this post, the Beatles song entitled, "Help" came to mind.  In fact, now the song is stuck in my head.  The link in the previous sentence seemed to "Help" with the condition.

There is one command that is very useful when you encounter the command prompt.  Since I am not very good at foreshadowing when writing, the command that I am trying to tell you about is the HELP command.


The HELP command can be used to provide you any information about some of the commands that can be used in the command line prompt.  If you type the word HELP at the prompt, you will get a long list of commands.  Unless you can read as fast as Johnny 5, then you need a way to read the list.  If you are using the command prompt within a window, then all you need to do is scroll up in the window.  Another way of looking at the list is using the MORE command with the character known as the vertical bar.  The  vertical bar key is located on the backslash key.  To type it, hold the SHIFT + \, and it looks like this, "|".  When you type at the command prompt, it looks like a broken vertical bar.

Type the following:

HELP | MORE

This will display the output of the HELP command, one screen at a time, and all you have to do is hit the SPACE BAR to go to the next screen.


In order to get further information about a command, just type the HELP along with the command that you need help with.

For example, HELP DIR, will give you a detailed description of the command in question, along with the switches (options) that can be used with the command.

If you get nothing from this posting, just know that at some point everyone needs some "Help".